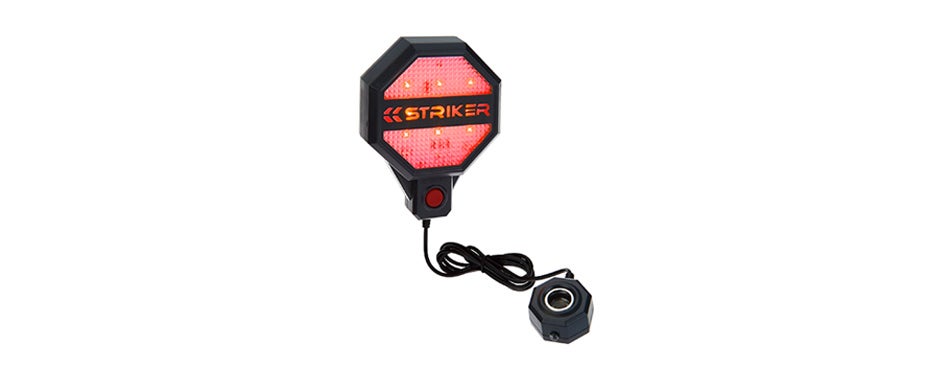
Striker Adjustable Garage Parking Sensor
How does the striker garage parking sensor work?
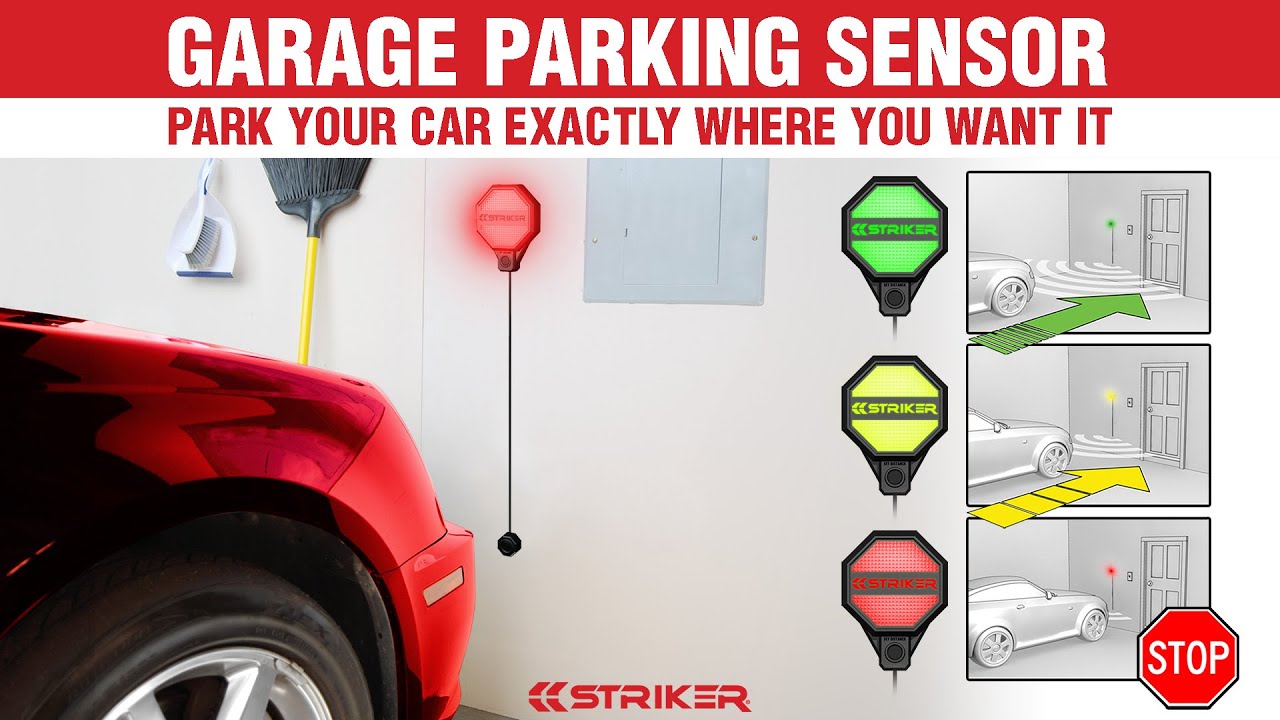
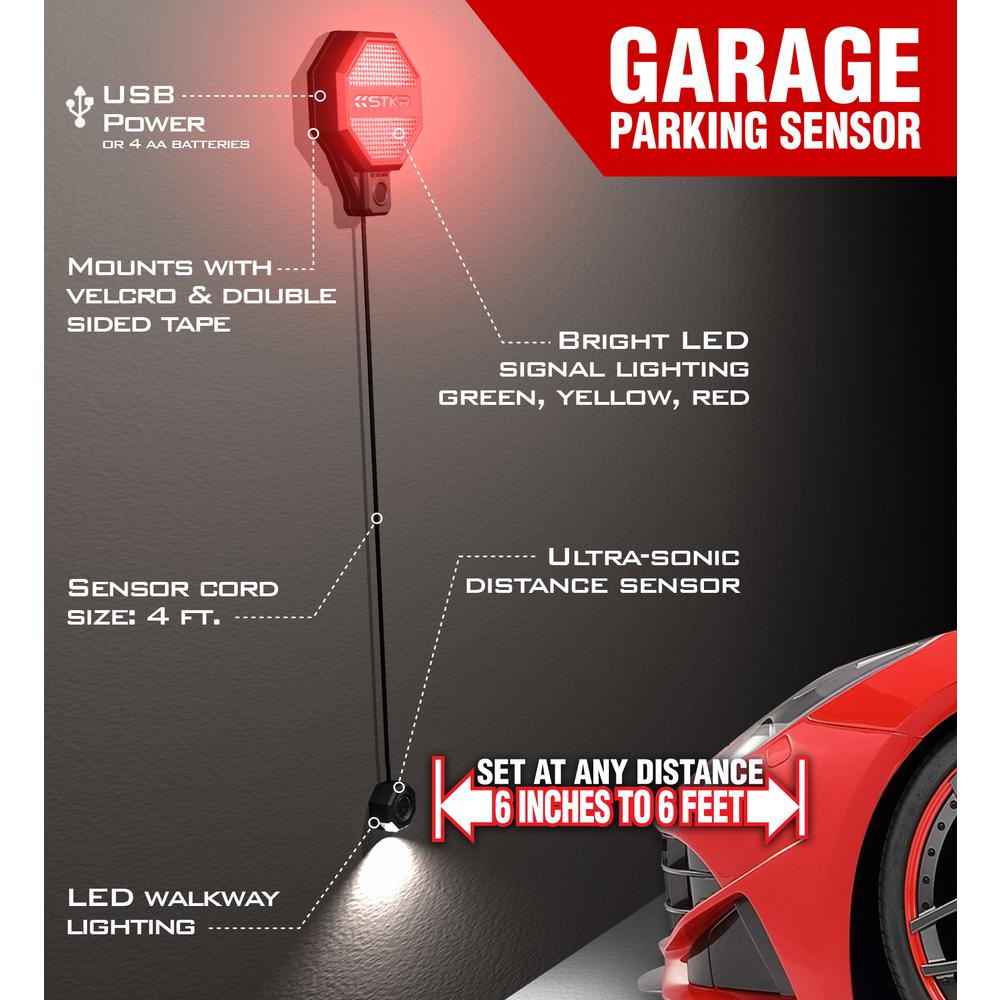
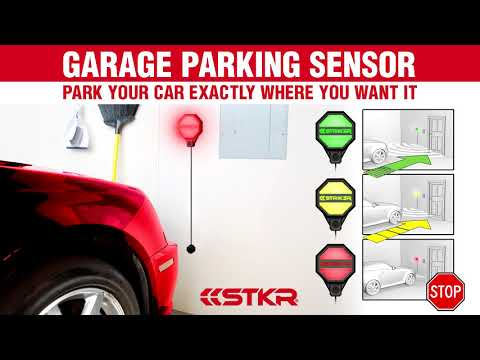
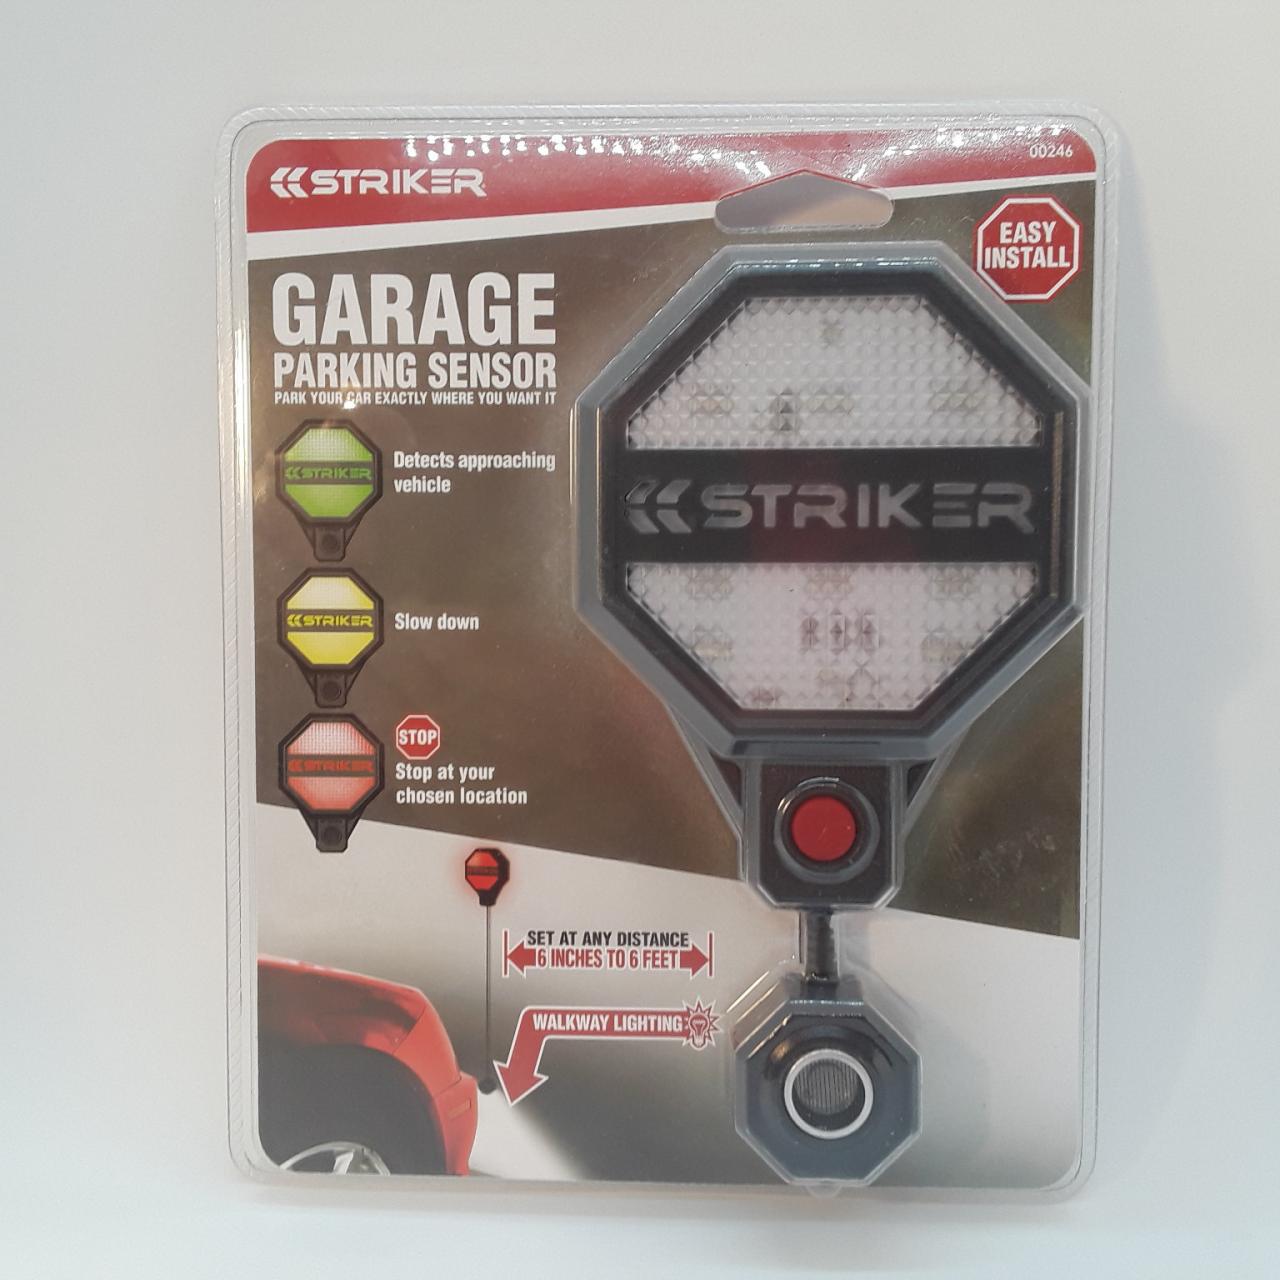
The Striker Garage Parking Sensor illuminates that spot creating a safe and well-lit walkway. The light is on a timer and will turn off after 2 minutes. The Garage Parking Sensor allows the user to set the exact distance the car should be parked from the sensor.
How big does a stkr parking sensor need to be?
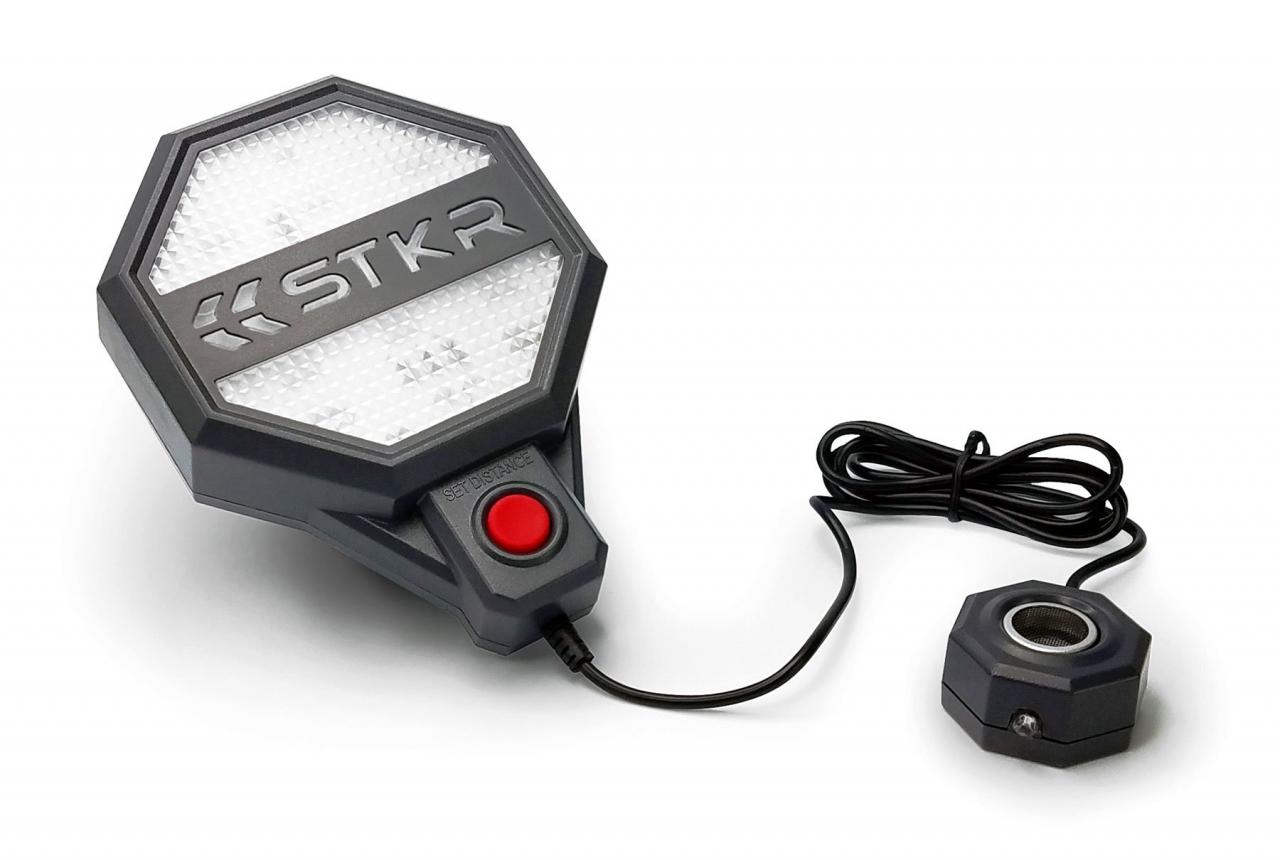
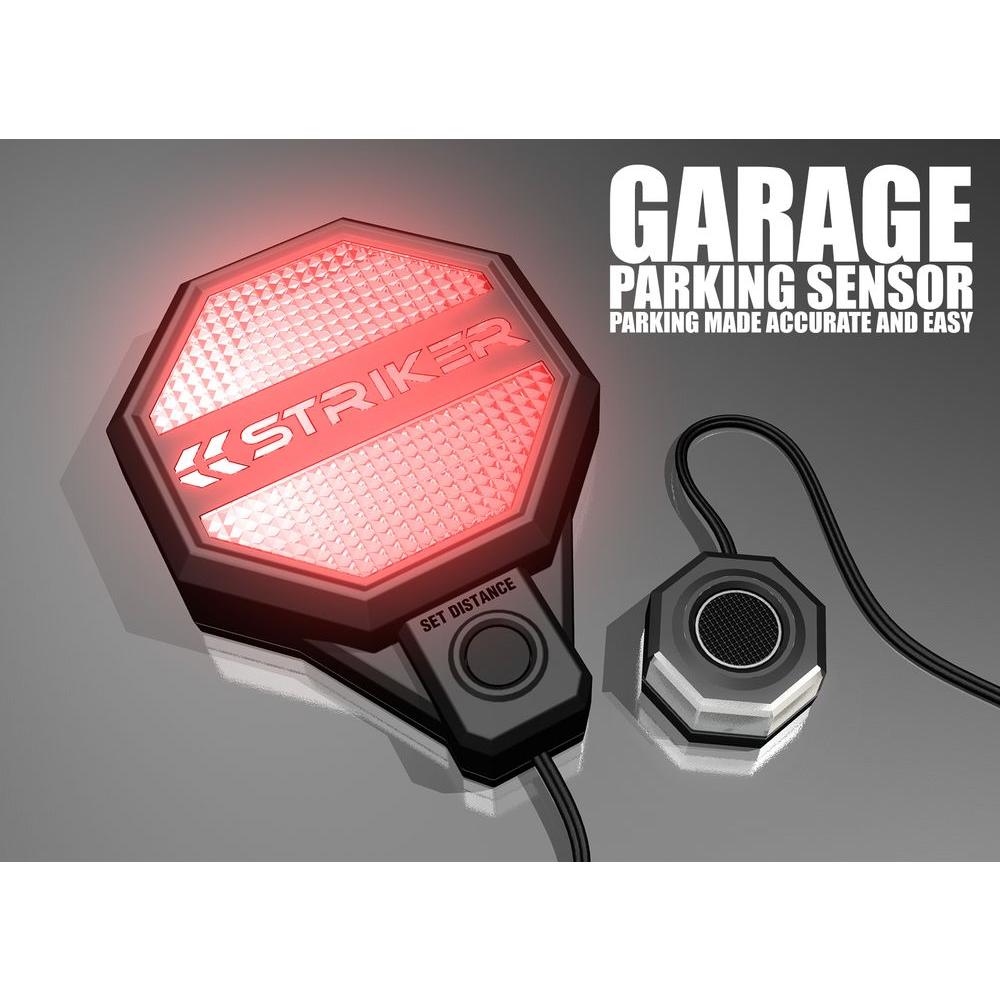
The STKR Parking Sensor eliminates the dents and dings from garage "fender benders" and allows you to safely close the garage door every time. Easy to install with the included double sided tape and Velcro, and adjustable between 6 inches and 6 feet. Powered by 4 AA batteries (not included).
What is the best way to calibrate a garage parking sensor?
The Garage Parking Sensor allows the user to set the exact distance the car should be parked from the sensor. To calibrate the unit, first, simply mount it in the garage using the supplied velcro and double-sided tape. Then, park the car in the desired stop zone and press the “SET DISTANCE” button.
Where to Mount parking sensor in Sonic garage?
Simply mount the sensor unit in front of your vehicle at bumper level, then mount the signal light in a position easily viewed from the driver’s seat. Lastly, park your vehicle exactly where you want it and press the set button. That’s it!
Another high tech option, this parking aid from Striker once again uses ultra-sonic pulses rather than lasers. It differs from the product above mainly by being even easier to install (yes, easier than four little screws!) and also by having a much larger, easier to see display. For some people, that could easily be a negative, as this is certainly not as discrete a design as the one we saw above from Measurements Ltd. On the other hand, if you want an easy to see visual display look no further.
In operation, this model is also very similar to the one above. So it flashes green as the car or truck approaches, yellow as it nears the ideal parking position and finally red to indicate you should come to a stop. Very simple to use then. Installation is easy too, with the bottom section attached to the wall at bumper height, the top indicator section attached where you can see it easily from inside the vehicle.
There are no screws required here either, just some sticky tape and Velcro. The sticky tape that comes with the product is crap though, so invest in something extra strong from 3M instead and the product will easily cling to the wall of the garage. All in all then a pretty well designed little parking aid.
Garage Parking Sensor – Park Your Car Exactly Where You Want It
image Source:Garage Parking Sensor – Perfect Parking Every Time | STKR Concepts
The STKR Garage Parking Sensor is designed to take the guess work out of parking your car in tight garage spaces. It features adjustable …
![]()
STRIKER Garage Parking Sensor | Lowe’s Canada
The STKR Parking Sensor is designed to take the guess work out of parking your car in tight garage spaces. It features adjustable, ultrasonic range-finding …
Adjustable Garage Parking Sensor | Brookstone
The STKR Parking Sensor is designed to take the guess work out of parking your car in tight garage spaces. It features adjustable, ultrasonic range-finding …
Tork Craft Striker Ultrasonic Garage Parking Sensor – PriceCheck
Tork Craft Striker Ultrasonic Garage Parking Sensor Product Info The Striker Adjustable Garage Parking Sensor is designed to take the guess work out of parking …

STKR Concepts Garage Ultra-Sonic Parking Sensor, 246
image Source:Garage Parking Sensor – Perfect Parking Every Time | STKR Concepts
This car parking sensor features adjustable, ultrasonic range-finding technology. Simply mount the parking sensor unit in front of your vehicle …
STKR Adjustable Parking Sensor – Walmart.com
The STKR Parking Sensor is designed to take the guess work out of parking your car in tight garage spaces. It features adjustable, ultrasonic range-finding …

Striker Adjustable Garage Parking Sensor – Pinterest
The STKR Parking Sensor is Designed to take the guess work out of parking your car in tight garage spaces. It features adjustable, ultrasonic range-finding …
Top 10 Best Garage Parking Aids Protect Doors, Walls, and Budgets
image Source:Adjustable Garage Parking Sensor | Design, Garage gift, Garage lighting
The Park-Daddy is a sensor-based parking system that uses sensors attached to your garage wall along with a transmitter/receiver …
Striker Garage Parking Sensor Light – Powa Beam
image Source:Striker Adjustable Garage Parking Sensor – Parking Aid | mysite
The Striker Garage Parking Sensor is designed to take the guess work out of parking your car in tight garage spaces. It features adjustable, ultrasonic …
Buy STKR Concepts 00-246 Adjustable Garage Parking Sensor Aid …
image Source:Striker Hand Tools 00246 Ultra-Sonic Adjustable Garage Parking Sensor
The STKR Parking Sensor is designed to take the guess work out of parking your car in tight garage spaces. It features adjustable, ultrasonic range-finding …